Tutorial: Federate Authorization Across Multiple Identity Providers
Available onOpen SourceCloudDedicatedEnterpriseThe federated authorization problem is a gap when teams rely on incompatible identity providers (IdP) that cannot be instantly unified. This creates a barrier where shared resources remain inaccessible to users, making impractical identity migrations the only traditional path forward. For example: You work at a large enterprise where one business unit logs in through Keycloak and contractors use GitHub, but they all need to share the same resources. This problem persists with the implementation of RAG pipelines and internal chatbots too.
This tutorial illustrates how you can use SpiceDB to centralize permissions by mapping disparate external accounts to a single, unified internal user model.
The central idea is: don’t point your resources at “the GitHub user” or “the Keycloak user.” Point them at an internal user you own, and bind each external account to it.
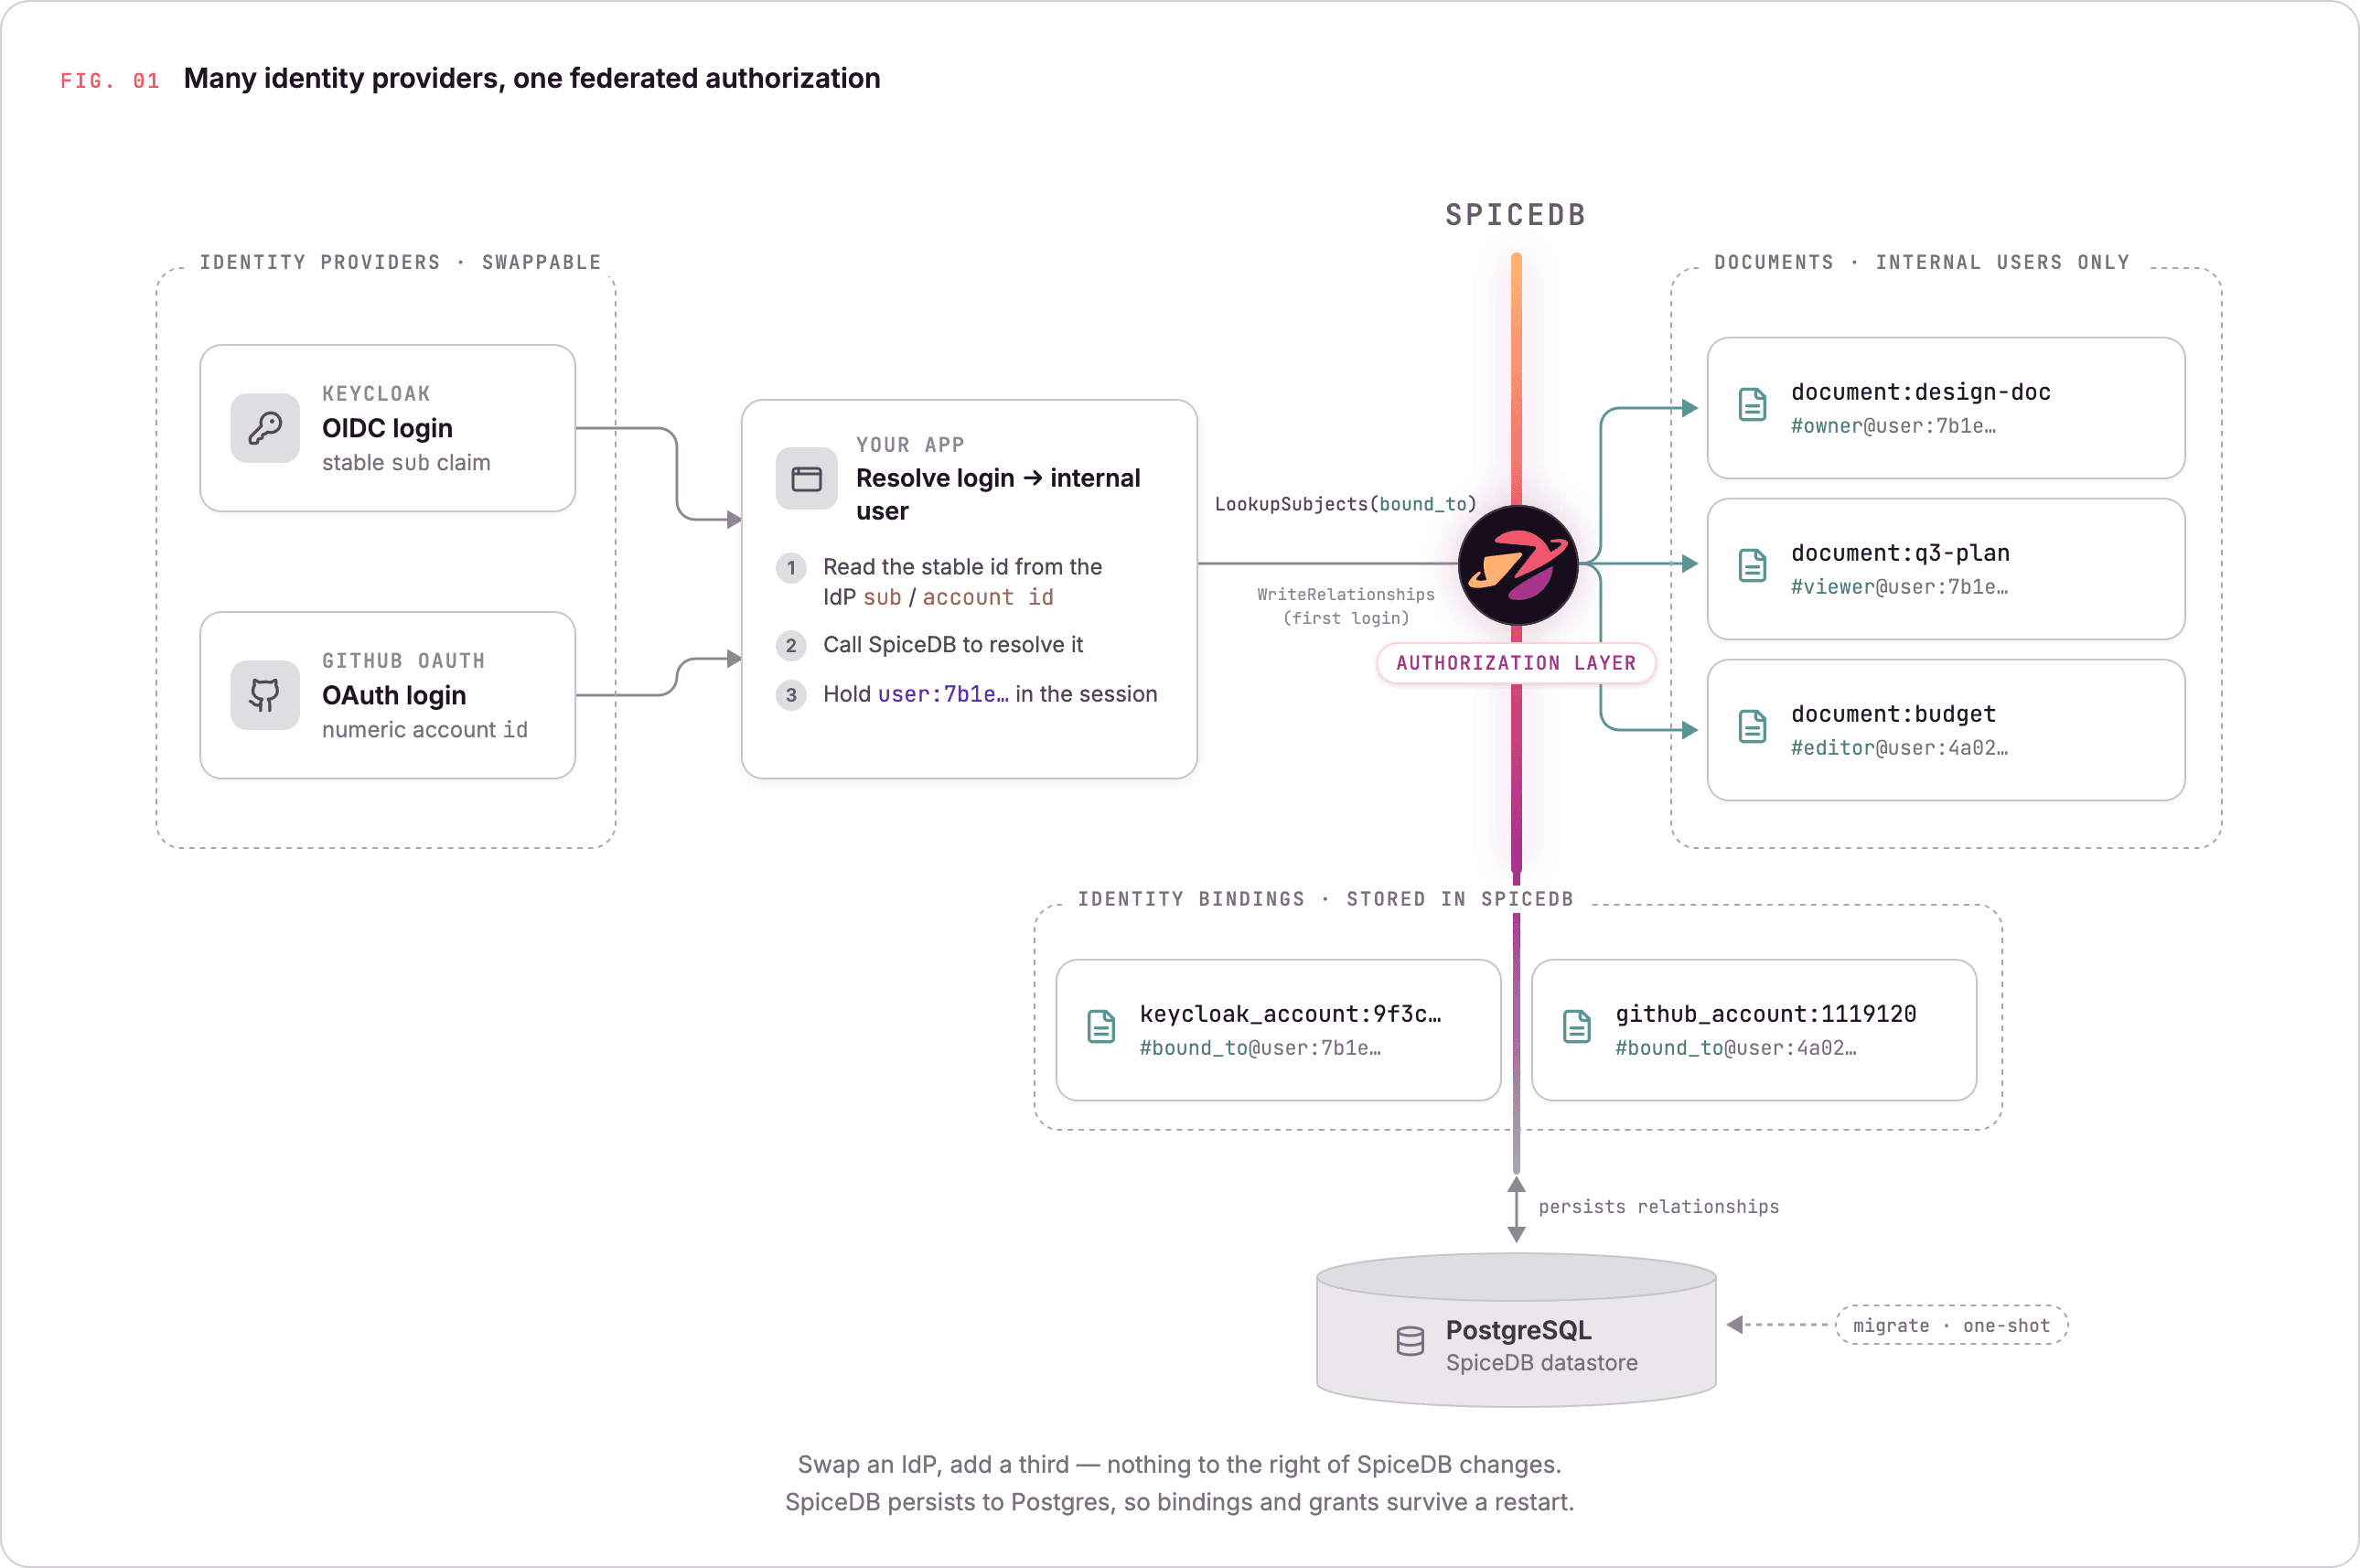
The full runnable demo for this tutorial lives in the authzed/examples
repository. It wires up
Keycloak, GitHub OAuth, SpiceDB, and PostgreSQL with Docker Compose, so you can run
docker-compose up --build and follow along against a live stack.
Prerequisites
-
A running SpiceDB instance. Install SpiceDB and start it.
-
The
zedCLI, pointed at your instance:zed context set tutorial localhost:50051 "demo-token-do-not-use-in-prod" --insecure -
An app that already authenticates users and can read each token’s stable id: the
subclaim for OIDC providers like Keycloak, the numeric account id for GitHub.
Step 1: Write the schema
Give each identity provider its own object type, and have both bind to a shared user.
Resources reference only that user.
definition user {}

definition keycloak_account {
    relation bound_to: user
}

definition github_account {
    relation bound_to: user
}

definition document {
    relation owner: user
    relation editor: user
    relation viewer: user

    permission edit  = editor + owner
    permission view  = viewer + edit
    permission share = owner
}
Write it:
zed schema write schema.zedkeycloak_account and github_account are separate types, so two providers can’t collide on an id.
The document definition has no idea either one exists.
Step 2: Resolve each login to an internal user
This is the critical federation step, and it runs in your app on every login. We’re going to use the sub claim (the stable, unique identifier the IdP promises won’t change) from their token, and look up keycloak_account:<sub>. That resolves to an internal user:<uuid>. A GitHub login does the same thing with GitHub’s numeric account id.
keycloak_account:9f3c…    #bound_to@user:7b1e…
github_account:1119120 #bound_to@user:4a02…-
Read the stable id from the token — the
subfor Keycloak, the account id for GitHub.Key on the immutable id but never the email. Emails change and get reassigned, so an email-keyed binding can silently point at the wrong person.
-
Call SpiceDB
LookupSubjectson<provider>_account:<id>’sbound_torelation to get the internaluser. If it resolves, you’re done.If the lookup errors, fail the login — otherwise the system can swallow the error and create a new user instead, and a returning user loses all their access.
-
If nothing is bound yet, mint a new
user:<uuid>and write the binding. -
Carry the resolved
user:<uuid>for the rest of the session. Every later permission check uses it, and never the raw IdP subject. This demo keeps it in a signed session cookie but in production you would probably use a server-side session store or a type of middleware to manage this.
A first Keycloak login writes one relationship:
zed relationship create keycloak_account:9f3c bound_to user:7b1eA GitHub login binds its own account to its own internal user:
zed relationship create github_account:1119120 bound_to user:4a02Step 3: Grant access
Permissions are written as relationships.
Make user:7b1e the owner of a document.
The Python examples assume an already-initialized SpiceDB client from the authzed-py library.
zed
zed relationship create document:readme owner user:7b1eEvery time a document is created, or a user is added to or removed from a doc, you create, update, or delete the corresponding relationship in SpiceDB: an owner when the document is created, a viewer or editor when you share it, and a deletion when you revoke access.
You don’t grant view, edit, and share separately.
You write owner, and the schema computes the rest.
Step 4: Check a permission
SpiceDB resolves permission by answering a question in the form of “is this actor allowed to perform this action on this resource?” or in this case “can user:7b1e view the doc?“
zed
zed permission check document:readme view user:7b1e
# trueThe check names a user:<uuid>, not a Keycloak or GitHub account as SpiceDB never learns which IdP the request came from.
Authentication is upstream, where your app trades an IdP token for the internal user id; authorization is downstream, where SpiceDB evaluates permissions against that id alone.
The two halves meet at the user id and nowhere else.
Step 5: Share, then list
Share the document with the GitHub-bound user as a viewer, and confirm the check flips to true:
zed
zed relationship create document:readme viewer user:4a02
zed permission check document:readme view user:4a02
# trueTo build a dashboard, ask the inverse question - which documents can this user see?
zed
zed permission lookup-resources document view user:4a02
# document:readmeThis uses SpiceDB’s LookupResources API. Instead of asking “can this user view this document?”, it answers “which documents can this user view?”.
That returns everything reachable through any path (owner, editor, or viewer) without those rules living in your app.
A note on persistence
The demo backs SpiceDB with PostgreSQL (--datastore-engine=postgres), with a one-shot datastore migrate head that runs before SpiceDB starts.
The bindings are the federation, so they have to outlive a restart.
If SpiceDB forgot keycloak_account:9f3c #bound_to user:7b1e, the next login would find nothing bound and mint a second user:<uuid> — the same failure the Step 2 warning guards against — and the first user’s document grants would be stranded on the old id.
Persisting to Postgres is what keeps a returning user mapped to the same internal user, and their access, across restarts.
The app keeps its own user profiles and document metadata in a local SQLite database, but SpiceDB stays the source of truth for identity bindings and authorization.
A note on consistency
The demo reads default to minimize_latency, which is fast but can be a few seconds stale.
When a user needs to see a change they just made, take the ZedToken returned by the write and pass it on the next read as at_least_as_fresh.
That gives you read-your-writes without giving up caching.
See Consistency for the details.
Next steps
This pattern is provider-agnostic: add a third IdP by adding one more *_account type, and nothing downstream changes.
To run this in production instead of a local container, provision a managed instance on AuthZed Cloud .
The authzed/examples repository has the complete demo — schema, app, and the Docker Compose stack. You could also add a third IdP or point it at your own documents.